Cheque Printing Online (CTS-2010 Layout)
Type the payee and amount once and print them neatly on your own cheque leaf: date in the boxes, amount in words (English or Hindi), figures, A/C Payee crossing and a signatory line. Test on plain paper first, then print for real.
- 100% free
- No sign-up
- Runs in your browser
- Updated October 2026
1Cheque details
2Printer and alignment
Fine-tune each field
Save one profile per bank or cheque book. Profiles stay only in this browser.
3Many cheques at once optional
Copy three columns from Excel and paste. Leave the date empty to use the date above. The PDF gets one page per cheque.
4Check, test and print
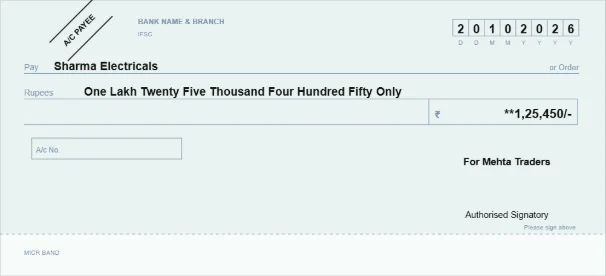
Always test first. Print the test page on plain paper at 100% / Actual size (not "Fit to page"), hold it over your cheque against light and nudge until the text sits on the lines. RBI's CTS-2010 standard fixes where the main fields go, but leaf sizes and print positions still differ a little between banks and printers.
Nothing is uploaded: names and amounts stay in your browser. A printed cheque still needs your own signature, and you should check every value before signing.
Print a neat cheque from your own printer
Handwritten cheques are slow when you write ten of them for salaries, rent or supplier payments, and a smudged amount or an overwritten date can get a cheque returned. Cheque printing software solves that, but most of it is paid desktop software. This page does the same job in your browser, for free: you type the payee and amount, the tool writes the amount in words, and it prints everything in the right place on your own cheque leaf.
It suits small business owners, shopkeepers, accountants, housing societies, schools and anyone who issues cheques regularly. It works with any Indian bank's CTS-2010 cheque book, because it starts from the layout RBI set for all banks and then lets you fine-tune it for your leaf and printer. Nothing is uploaded, there is no sign-up, and you can save a separate printer setting for each cheque book.
How to print a cheque
- Enter the date, the payee name and the amount. The amount in words appears as you type, with lakh and crore, in English or Hindi.
- Choose the crossing (A/C PAYEE is the default), and add a "Not over" limit or a "For company name" line if you use them.
- Under Printer and alignment, pick how the leaf goes into your printer: on its own page, at the top of an A4 page, or turned sideways for printers that feed narrow paper in the middle.
- Measure your leaf with a ruler and enter its width and height.
- Click Test print and print it on plain A4 paper at 100% / Actual size. Hold the sheet over a blank cheque against a window or lamp.
- If the text is off, enter how many millimetres to move it (minus moves left or up) and test again. Use "Fine-tune each field" if only one field is off, such as the date boxes.
- When the test lines up, save the settings as a profile, feed a real cheque leaf and click Cheque PDF or Print.
- Check every value on the printed cheque, then sign it by hand.
Where the fields sit on a CTS-2010 cheque
In 2010 the Reserve Bank of India issued the "CTS-2010 Standard" for cheque forms. Besides security features such as the CTS-INDIA watermark and the VOID pantograph, it mandated the placement of the significant fields, so that cheque images can be read by machines in the Cheque Truncation System. The sample leaf in RBI's annex gives these measurements, which this tool uses as its starting template:
| Field | Position on RBI's sample leaf |
|---|---|
| Leaf width | 101 mm + 101 mm |
| Top edge to MICR band | 39 mm + 39 mm |
| "Pay" line | 24.5 mm below the top edge, starting 8 mm from the left |
| Amount in words | two "Rupees" lines, each 8.5 mm below the one above |
| Date | eight boxes, D D M M Y Y Y Y, at the top right |
| Amount in figures | a box on the right, 39 mm wide for the figures, level with the Rupees lines |
| A/c No. box | 10.6 mm from the left edge |
Banks and their printers follow this layout, but the leaf you hold can still differ by a millimetre or two, and so can the spot where your printer puts the first line of ink. That's why the tool has a test print, nudges in half-millimetre steps and a separate date box width setting. The standard also says that no changes or corrections should be made on a cheque except for date validation; if something prints wrongly, cancel that leaf and use a fresh one.
Filling each field correctly
- Date: one digit per box, day first (20102026 for 20 October 2026). A cheque is valid for three months from its date, as set by RBI's circular of November 2011. You can leave the date blank and write it by hand.
- Payee: the exact name on the payee's bank account, such as "Sharma Electricals" or "Ravi Kumar". Long names shrink to fit before the printed "or Order" / "or Bearer".
- Amount in words: ends with "Only" so nothing can be added. Paise are written as "and Fifty Paise" if your amount has them. For a Hindi cheque, choose Hindi to get "एक लाख पच्चीस हज़ार रुपये मात्र". To check any amount separately, use the amount in words converter.
- Figures: the default "**1,25,450/-" style puts stars before and "/-" after, so no digit can be added at either end.
- Crossing: two parallel lines make a crossed cheque, which a bank pays only into an account, under sections 123 to 131 of the Negotiable Instruments Act, 1881. "A/C PAYEE" between the lines is the usual instruction to credit only the payee's account.
Choosing the print mode
Most home and office printers take a cheque through the manual or rear feed slot. If yours has paper guides that close in from both sides, the leaf sits in the middle of the paper path, so choose A4 page, cheque at the top centre. If the guide is fixed on one side, choose top left. Printers that only grip narrow paper in the centre usually want the leaf turned, so try the two cheque turned options. The cheque-size page option makes a PDF exactly as big as the leaf, for printers whose driver lets you set a custom paper size.
Tips and common mistakes
- Always print at 100%. "Fit to page" shrinks everything and nothing lines up.
- Feed one leaf at a time, face up unless your printer's manual says otherwise. Tear the leaf neatly along its perforation first.
- Use black or dark blue ink. Light colours don't scan clearly in clearing.
- Don't print the signature. Sign every cheque by hand after checking the printout.
- For large amounts, ask your bank whether it needs the cheque details in advance under its Positive Pay rules.
- Keep a profile per cheque book. A new book from the same bank usually needs no change, but a different bank might.
Paying many suppliers at once? Paste the list from Excel into "Many cheques at once" and print them in one go, one leaf per page, all with the same alignment. Your list and profiles never leave your browser.
Frequently asked questions
Is it allowed to print on a cheque instead of writing by hand?
Yes. Companies have printed cheques for decades, and banks accept a printed payee, amount and date as long as the cheque is filled correctly and signed by the account holder. What matters is that nothing is overwritten or corrected, because RBI's CTS-2010 standard says no changes should be made on a cheque other than date validation.
What is the size of a CTS-2010 cheque leaf?
RBI's sample layout marks the leaf as 101 + 101 mm wide and 39 + 39 mm from the top edge to the MICR band. Most leaves are therefore about 202 mm wide and a little over 90 mm tall, but cut sizes vary slightly between banks and printers, so measure your own leaf and enter it in the tool.
Why does my printed text not sit on the lines?
Printers feed paper slightly differently, and cheque books from different banks are not cut identically. Print the test page on plain paper, hold it over the leaf against light and use the 'Move everything' or per-field boxes to shift the text in 0.5 mm steps. Save the result as a profile so you only do this once per cheque book.
Which printer works best for cheques?
Any inkjet or laser printer with a manual or rear feed slot that accepts small or thick paper. Feed one leaf at a time. If your printer only takes narrow paper in the middle of the tray, choose one of the 'cheque turned' options so the leaf goes in short edge first.
Should I write 'Rupees' and 'Only' with the amount in words?
Most leaves already print 'Rupees' at the start of the line, so the tool leaves it out by default and ends the words with 'Only' so nothing can be added after them. Turn on 'Start the words with Rupees' if your leaf has no printed word.
What does A/C PAYEE crossing do?
Two parallel lines across the top left corner make a crossed cheque, which is paid into a bank account rather than over the counter in cash (Negotiable Instruments Act, sections 123 and 126). Writing A/C PAYEE between the lines tells the bank to credit only the named payee's account.
Can I print many cheques at once?
Yes. Paste three columns from Excel (date, payee, amount) into 'Many cheques at once'. The PDF gets one page per cheque, so you feed one leaf for each page and every cheque uses the same alignment.
Is my payee and amount data uploaded?
No. Everything is drawn in your browser and the PDF is made on your device. Your saved printer profiles stay in this browser's local storage.